Ja:Ubiquity 0.1.2 User Tutorial: Difference between revisions
m (メールで送りつける。) |
(入門編着手) |
||
| Line 2: | Line 2: | ||
== 他言語 == | == 他言語 == | ||
[[ja:Ubiquity 0.1.2 User Tutorial| | [[ja:Ubiquity 0.1.2 User Tutorial|日本語]] [[es:Ubiquity 0.1.2 User Tutorial|En español]] [[zh-CN:Ubiquity 0.1.2 User Tutorial|简体中文]] [[es:Ubiquity 0.1.2 User Tutorial|En español]] [[it:Ubiquity 0.1.2 User Tutorial|in italiano]] [[de:Ubiquity 0.1.2 User Tutorial|in Deutsch]] | ||
[[ru:Ubiquity 0.1.2 User Tutorial|По-русски]] [[fr:Ubiquity 0.1.2 User Tutorial|En français]] [[pt:Ubiquity 0.1.2 User Tutorial|em português]] | [[ru:Ubiquity 0.1.2 User Tutorial|По-русски]] [[fr:Ubiquity 0.1.2 User Tutorial|En français]] [[pt:Ubiquity 0.1.2 User Tutorial|em português]] | ||
= はじめに = | = はじめに = | ||
Ubiquity | Ubiquity はあなたのWebにおける体験を強力に新しくする、Firefox の実験的な拡張機能です。 | ||
<!-- | <!-- | ||
Ubiquity is an experimental Firefox extension that gives you a powerful new way to interact with the Web. | Ubiquity is an experimental Firefox extension that gives you a powerful new way to interact with the Web. | ||
| Line 38: | Line 38: | ||
--> | --> | ||
Ubiquity は進行中のプロジェクトですので、協力して下さる方は歓迎いたします。このチュートリアルを読んで、Ubiquity がより使いやすくなる方法や、今後の開発に役に立つような事を思い付いついたなら、[http://getsatisfaction.com/mozilla/products/mozilla_ubiquity 是非お聞かせください]。Ubiquity | Ubiquity は進行中のプロジェクトですので、協力して下さる方は歓迎いたします。このチュートリアルを読んで、Ubiquity がより使いやすくなる方法や、今後の開発に役に立つような事を思い付いついたなら、[http://getsatisfaction.com/mozilla/products/mozilla_ubiquity 是非お聞かせください]。Ubiquity は、まだ始まったばかりです。あなたにもこのプロジェクトの方向性を決めるチャンスがあるのです。 | ||
<!-- | <!-- | ||
Ubiquity is still a work in progress, and we are eager for you to join our virtual team to experiment. If, when reading this tutorial, you think of a way to make Ubiquity easier to use, or an idea for its future development, we hope you'll take a moment to [http://getsatisfaction.com/mozilla/products/mozilla_ubiquity share your thoughts]. By getting involved with Ubiquity while the project is still in its early stages, you have an opportunity to shape the direction of its growth. | Ubiquity is still a work in progress, and we are eager for you to join our virtual team to experiment. If, when reading this tutorial, you think of a way to make Ubiquity easier to use, or an idea for its future development, we hope you'll take a moment to [http://getsatisfaction.com/mozilla/products/mozilla_ubiquity share your thoughts]. By getting involved with Ubiquity while the project is still in its early stages, you have an opportunity to shape the direction of its growth. | ||
--> | --> | ||
==Macをご利用の場合== | |||
[http://growl.info/ Growl]のインストールが必要です。この Mac OS X のシステム拡張機能により、控えめに透過されたメッセージの表示が可能になります。 Ubiquity は 、コマンドからの出力や、エラーメッセージの表示に、Growl の通知機能を利用しています。 | |||
<!-- | <!-- | ||
You'll need to install [http://growl.info/ Growl]. This is a Mac OS X system extension that applications can use to display unobtrusive transparent messages. Ubiquity uses Growl notifications to show you the output of commands and tell you about errors. | You'll need to install [http://growl.info/ Growl]. This is a Mac OS X system extension that applications can use to display unobtrusive transparent messages. Ubiquity uses Growl notifications to show you the output of commands and tell you about errors. | ||
--> | |||
Windows(XP またはそれ以上) であれば、何もインストールする必要はありません。Ubiquity はシステム組み込みの"トースター"風のポップアップメッセージを出力します。 | |||
<!-- | |||
On Windows (XP and later), you don't need to install anything special, as Ubiquity will use the operating system's built-in "toaster"-style pop-up messaging. | On Windows (XP and later), you don't need to install anything special, as Ubiquity will use the operating system's built-in "toaster"-style pop-up messaging. | ||
--> | |||
Linux も、必要な物は特にありません。ただし、Firefox は最新版にしておいて下さい。 | |||
<!-- | |||
On Linux, you shouldn't have to do anything special: just make sure you're updated to the latest version of Firefox. | On Linux, you shouldn't have to do anything special: just make sure you're updated to the latest version of Firefox. | ||
--> | |||
= | = 入門編 = | ||
== | == Ubiquity の セットアップ == | ||
まず、 [https://people.mozilla.com/~avarma/ubiquity-0.1.xpi Ubiquity をインストールして下さい]。インストールが完了したら、Mac ユーザーの方は '''option+space''' を、 Windows の方は '''control+space''' を、 Linux の方は '''alt+space''' を押してみて下さい。 | |||
<!-- | |||
If you haven't already done so, [https://people.mozilla.com/~avarma/ubiquity-0.1.xpi install Ubiquity]. Once you've done that, you can summon Ubiquity by tapping '''option-space''' on the Mac, or '''control-space''' if you're on Windows. On Linux, try '''alt-space''' | If you haven't already done so, [https://people.mozilla.com/~avarma/ubiquity-0.1.xpi install Ubiquity]. Once you've done that, you can summon Ubiquity by tapping '''option-space''' on the Mac, or '''control-space''' if you're on Windows. On Linux, try '''alt-space''' | ||
--> | |||
上記の同時押しが上手く行った場合、ブラウザの左上に、白いカーソルが点滅している、黒くて透明な何かしらが現れます。 | |||
<!-- | |||
Once you hit the appropriate key-combo, you'll be presented with a transparent black box, with a blinking white cursor, in the upper-left of your browser. | Once you hit the appropriate key-combo, you'll be presented with a transparent black box, with a blinking white cursor, in the upper-left of your browser. | ||
--> | |||
http://www.toolness.com/images/20080714190900.jpg | http://www.toolness.com/images/20080714190900.jpg | ||
コマンドは、この状態で入力します。何かテキトウに入力して、エンターキーを押します。話を簡単にするために、これからはこの一連の行為を、コマンドを "発行" すると表現します。 "'XYZ'を発行します" と言う表現は、 "alt+space (又は ctrl+space) を押して Ubiquity を開き、XYZ とタイプします" と言う意味です。 | |||
<!-- | |||
You give Ubiquity a command by typing something in here and then hitting the Enter key. For the sake of brevity, we'll call this "issuing" a command. For the rest of this tutorial, when we say to "issue 'XYZ'", we mean "hit alt-space (or ctrl-space) to bring up the Ubiquity box, then type XYZ". | You give Ubiquity a command by typing something in here and then hitting the Enter key. For the sake of brevity, we'll call this "issuing" a command. For the rest of this tutorial, when we say to "issue 'XYZ'", we mean "hit alt-space (or ctrl-space) to bring up the Ubiquity box, then type XYZ". | ||
--> | |||
== | == コマンド其の一: Wikipedia 検索 == | ||
Wikipediaから始めてみましょう。あなたが babel fish について知りたいとします。この場合、"wikipedia babel fish" を発行してみて下さい。 | |||
<!-- | |||
Let's start with Wikipedia. Say you want to know what a "babel fish" is. You simply issue "wikipedia babel fish". | Let's start with Wikipedia. Say you want to know what a "babel fish" is. You simply issue "wikipedia babel fish". | ||
--> | |||
コマンドをタイプしている間、コマンド入力欄の下に、2つの物が表示されます。現在のコマンドの、'''入力候補''' (suggestion list)、そして '''プレビュー''' です。以下の画像は、 プレビューに "Searches Wikipedia" と表示され、入力候補に "wikipedia" と "weather" が挙がっている状態を示したものです。 | |||
<!-- | |||
While you're typing your command, you'll see two things underneath the input box: A '''suggestion list''' and a '''preview''' of the current command. In the picture below, the suggestion list consists of "wikipedia" and "weather", while the preview says "Searches Wikipedia". | While you're typing your command, you'll see two things underneath the input box: A '''suggestion list''' and a '''preview''' of the current command. In the picture below, the suggestion list consists of "wikipedia" and "weather", while the preview says "Searches Wikipedia". | ||
--> | |||
http://www.toolness.com/images/20080819152417.jpg | http://www.toolness.com/images/20080819152417.jpg | ||
"wikipedia babel fish" とタイプし終わったら、 Babel Fish に関する様々な Wikipedia のページの概要を見てください。 | |||
<!-- | |||
When you finish typing "wikipedia babel fish" you should see some summaries of various Wikipedia pages about Babel Fish, like so: | When you finish typing "wikipedia babel fish" you should see some summaries of various Wikipedia pages about Babel Fish, like so: | ||
--> | |||
http://www.toolness.com/images/20080819152930.jpg | http://www.toolness.com/images/20080819152930.jpg | ||
上記の情報がウィキぺディアから収集されるにはちょっと時間がかかるかもしれませんが、Ubiquity はこの間もバッチリ応答可能です。 | |||
<!-- | |||
It will take a moment for the above information to be gleaned from Wikipedia, but Ubiquity stays fully responsive during this time. | It will take a moment for the above information to be gleaned from Wikipedia, but Ubiquity stays fully responsive during this time. | ||
--> | |||
この状態で: | |||
* Enter (又は Return) を押して、コマンドを'''実行'''してみましょう。Wikipedia コマンドを実行すれば、Wikipedia のページにジャンプできます。 | |||
* Escape を押せば、コマンドは'''キャンセル'''できます。 Ubiquity は何もせず消えます。 | |||
* プレビューの'''リンク'''をクリックする事も出来ます。 Wikipedia コマンドのプレビューの場合、気になるリンクをクリックすれば、直接その記事にジャンプできます。 | |||
<!-- | |||
Next, you can: | Next, you can: | ||
* Hit Enter (or Return) to '''execute''' the command. Executing the Wikipedia command has the effect of taking you to the Wikipedia page. | * Hit Enter (or Return) to '''execute''' the command. Executing the Wikipedia command has the effect of taking you to the Wikipedia page. | ||
* Hit Escape to <b>cancel</b> the command. Ubiquity disappears with no effect. | * Hit Escape to <b>cancel</b> the command. Ubiquity disappears with no effect. | ||
* Click on one of the <b>links</b> in the preview. In the case of the Wikipedia preview, clicking a link will take you directly to the article you're interested in. | * Click on one of the <b>links</b> in the preview. In the case of the Wikipedia preview, clicking a link will take you directly to the article you're interested in. | ||
--> | |||
<!-- | |||
== Abbreviating Commands and Using the Suggestion List == | == Abbreviating Commands and Using the Suggestion List == | ||
Revision as of 17:59, 20 May 2009
戻る.
他言語
日本語 En español 简体中文 En español in italiano in Deutsch По-русски En français em português
はじめに
Ubiquity はあなたのWebにおける体験を強力に新しくする、Firefox の実験的な拡張機能です。
どこかのページへ移動したい場合、これまでなら、あなたは URL バーにアドレスを打ち込んで、Firefoxに行き先を伝えていたと思います。
Ubiquity をインストールすれば、あなたは言葉を使って、 Firefox にあなたが何をしたいかを伝える事が出来ます。これをコマンドと呼びます。

Ubiquity のコマンドの可能性はほぼ無限大です。Ubiquity と各種コマンドを利用すれば、あなたの Web 上での作業はより速く、より簡単になる事でしょう。このチュートリアルでは、その一部を紹介します。そしてこのチュートリアルが終わる頃には、あなたは Wikipedia、 Google、 definition、 Yelp でスピーディーに検索したり、メールに地図を挿入したり、 Web ページの一部を翻訳したり、単語をハイライトして友達にメールで送りつけたり、等といった事が出来るようになっているでしょう。
Ubiquity にデフォルトで入っているコマンドは、飽くまでもその可能性の第一歩です。誰でも新しいコマンドを自作し、共有する事が出来るのです。コマンドを作成し、 - Web を拡張する - こと。それは Web ページを作成することと同じくらい簡単です。もし自分でコマンドを作ってみたくなったら、開発者用チュートリアルをチェックしてみて下さい。
Ubiquity は進行中のプロジェクトですので、協力して下さる方は歓迎いたします。このチュートリアルを読んで、Ubiquity がより使いやすくなる方法や、今後の開発に役に立つような事を思い付いついたなら、是非お聞かせください。Ubiquity は、まだ始まったばかりです。あなたにもこのプロジェクトの方向性を決めるチャンスがあるのです。
Macをご利用の場合
Growlのインストールが必要です。この Mac OS X のシステム拡張機能により、控えめに透過されたメッセージの表示が可能になります。 Ubiquity は 、コマンドからの出力や、エラーメッセージの表示に、Growl の通知機能を利用しています。
Windows(XP またはそれ以上) であれば、何もインストールする必要はありません。Ubiquity はシステム組み込みの"トースター"風のポップアップメッセージを出力します。
Linux も、必要な物は特にありません。ただし、Firefox は最新版にしておいて下さい。
入門編
Ubiquity の セットアップ
まず、 Ubiquity をインストールして下さい。インストールが完了したら、Mac ユーザーの方は option+space を、 Windows の方は control+space を、 Linux の方は alt+space を押してみて下さい。
上記の同時押しが上手く行った場合、ブラウザの左上に、白いカーソルが点滅している、黒くて透明な何かしらが現れます。

コマンドは、この状態で入力します。何かテキトウに入力して、エンターキーを押します。話を簡単にするために、これからはこの一連の行為を、コマンドを "発行" すると表現します。 "'XYZ'を発行します" と言う表現は、 "alt+space (又は ctrl+space) を押して Ubiquity を開き、XYZ とタイプします" と言う意味です。
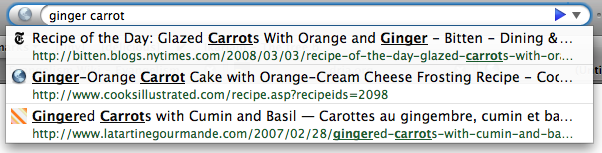
コマンド其の一: Wikipedia 検索
Wikipediaから始めてみましょう。あなたが babel fish について知りたいとします。この場合、"wikipedia babel fish" を発行してみて下さい。
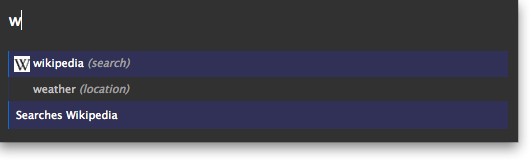
コマンドをタイプしている間、コマンド入力欄の下に、2つの物が表示されます。現在のコマンドの、入力候補 (suggestion list)、そして プレビュー です。以下の画像は、 プレビューに "Searches Wikipedia" と表示され、入力候補に "wikipedia" と "weather" が挙がっている状態を示したものです。
"wikipedia babel fish" とタイプし終わったら、 Babel Fish に関する様々な Wikipedia のページの概要を見てください。
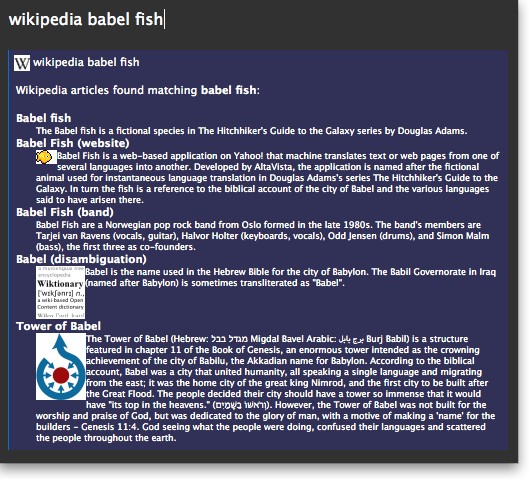
上記の情報がウィキぺディアから収集されるにはちょっと時間がかかるかもしれませんが、Ubiquity はこの間もバッチリ応答可能です。
この状態で:
- Enter (又は Return) を押して、コマンドを実行してみましょう。Wikipedia コマンドを実行すれば、Wikipedia のページにジャンプできます。
- Escape を押せば、コマンドはキャンセルできます。 Ubiquity は何もせず消えます。
- プレビューのリンクをクリックする事も出来ます。 Wikipedia コマンドのプレビューの場合、気になるリンクをクリックすれば、直接その記事にジャンプできます。