Open Design: Difference between revisions
(adding screenshots) |
(add instructions) |
||
| Line 7: | Line 7: | ||
# Create your account at [http://www.github.com Github.com] | # Create your account at [http://www.github.com Github.com] | ||
# Email your Github handle to ehunt@mozilla.com - she'll add you to the Github org as a Member. | # Email your Github handle to ehunt@mozilla.com - she'll add you to the Github org as a Member. | ||
# You'll receive an email invitation inviting you to join FxOS Product Design. You need to accept the invitation before doing the next step - Set Up Github Desktop | |||
=== Set up Github Desktop client === | === Set up Github Desktop client === | ||
Revision as of 22:35, 22 October 2015
< intro here>
Instructions for Team Alopex
This section includes instructions for Alopex Product + Design teams.
Create a Github Account
- Create your account at Github.com
- Email your Github handle to ehunt@mozilla.com - she'll add you to the Github org as a Member.
- You'll receive an email invitation inviting you to join FxOS Product Design. You need to accept the invitation before doing the next step - Set Up Github Desktop
Set up Github Desktop client
1. Install Github Desktop client.
2. Open Github Desktop. Click the button to move Github Desktop to your Applications folder. Github Desktop will close briefly and re-open itself from your Applications folder.

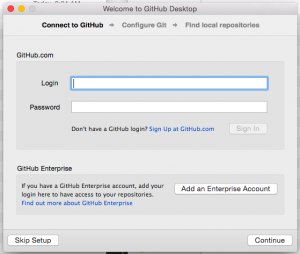
3. Click "Continue" on the welcome screen.

4. Enter your Github credentials and click "Continue." We're not using the Enterprise options, so don't click that.
- If you're using two-factor authentication, you'll be asked to enter that before you can click "Continue."

5. Confirm your account and click "Continue."

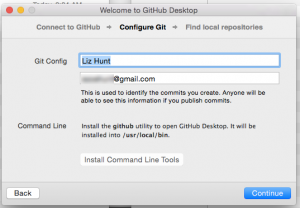
6. Configure Git and click "Continue." Confirm (or edit) the name and email address you want associated with this project on Github.
- You can install the command line tools if you want to. But they're not required to use Github for Project Alopex.

7. Click "Done" on the Find Local Repos screen. This screen is asking if you want Github Desktop to know about your existing local repositories. If you're new to Github, you won't have any local repositories. So just click "Done." If you already have some repos on your computer, select the ones you want Github Desktop to know about.

8. You're done!" Github Desktop setup is complete. Skip the tutorial.

Clone the Alopex Repository
- Decide on a location for your local repositories. Choose the location thoughtfully - moving a repo to a different directory after you've done Step 4 can cause problems later. See the example directory structure below this section.
- Clone the remote Github repo. This makes a copy of the remote Github repo directory structure on your computer (a local repo).
- In Github Desktop, go to File > Clone repository.
- Select the remote repo you want to add, and click Clone <repo name>.
- Github Desktop will ask you the destination for the cloned repo. Browse to the directory where you intend to store your repos. With the example directory structure below, you would browse to Sites / FxOS_Product_Design
- Then click Clone.
- You're done!

If you want to use the command line, go for it, though be mindful of how we're using Github.
- Designers in particular work alone on their files. So we're not (overly) concerned about collisions.
- We've created a simplified workflow so designers and other non-dev teammates can start using Github faster with a less steep learning curve.
- We're only using the master branch.
- We're not accepting pull requests (for now) -- this may change your workflow. You can just clone and pull/push to master.
Example Workflow
- Create something you want to share in public.
- Export files.
- For designers, export as pdf or image.
- For others, you might want to export as a pdf (e.g., if you've created slides) or just create text files - Github uses Markdown, so it's easy to format docs in a nice way.
- If you were using the example directory structure above, you would export your file to Sites / FxOS_Product_Design / alopex / folder-name
- Push to Github using instructions below.
Pushing to Github
This workflow is a simplified way to interact with Github. We're using this simplified approach so team members who aren't familiar with Github can get used to it, before we move on to more sophisticated methods.
In this workflow, you're pushing directly to the master branch (source of truth) with no 2nd person review. As with Dropbox and Box, it’s possible to overwrite someone else’s changes to the same file if you’re not careful.
- Open Github Desktop client.
- Get latest files from Github. In Github Desktop, go to Repository>Pull. This grabs any files from the remote repo that differ from what you have in your local repo.
- Confirm that your changes appear in your local repo.
- If you've already exported your pdf (or image) into your local repo, the top bar of the Github Desktop client will say "XX uncommitted changes."
- If it doesn't say that, move (or copy) your changed files into your local repo.
- Describe your changes.
- If it's not already highlighted, click the "XX uncommitted changes" tab.
- Type a descriptive summary of your changes in the Summary input field.
- Add a description in the Description field. Describe the difference between your changes and the current versions on the remote Github repo. For example, you could copy your Change Log details into the Description field.
- Note that the Summary and Description text are displayed in Github History, so other people can see what you’ve changed.
- Commit (save) your local repo. When you're satisfied that you've got all the changes you want included in this commit, and you’re satisfied with the Summary and Description, click "Commit to master." Your changes are now saved as a package in your local repo.
- Push to Github. Go to Repository>Push. This immediately sends the package of changes to the remote Github repo and creates a new version for each changed file.
- Confirm your changes on Github. Visit the remote repo on the web and browse the folders where you expect to see the changed files. If it doesn't look the way you expect it to, repeat Steps 2-7. Note: once you get used to using Github, you probably won't need to do this step.
Tips:
- If you need to stop in the middle of Steps 2-7 and start over later, it's a good idea to start over again at Step 2. This helps ensure that you don’t overwrite someone else’s change to the same file.
- For now, please don't use Github's fork or pull request functionality. As we’re all learning how to use Github, we want to stick to basic Github commands for now - clone, pull, commit, push.
- Within the Github Desktop client, please don't use the Sync button, as well as the Publish/Unpublish options in the Branch menu. These do unexpected things that impact the remote repo.
Gathering Feedback from Team and Collaborators
All files in the remote Github repo are visible to anyone on the web. So people can browse the repo and look at your files if they want to get an update on the project. But we'll get more (and more effective) feedback if we actively solicit it.
- Copy the remote repo URLs for the files you want feedback on.
- Open a new issue. Go to the repo’s Open Issues and click New Issue.
- Enter a short descriptive title for the issue.
- Label the issue. Be sure to use feedback wanted label. You can also use any of the other labels.
- Add comments. Use the Comment field to provide context for your request for feedback and to describe the kind of feedback you're looking for. E.g., maybe it's specific - help me figure out this piece. It might be more broad - does Flow X work better than Flow Y?
- Include the copied URLs in the Comment.
- Post a message to the fxos-dev mailing list and include request for feedback with the URL to the new Open Issue. This way we'll hit contributors who may not know about our Github org.
Github Roles
- Members: Everyone on a project team is invited to the project's Github repo as a Member. Members can clone, pull, and push to any repositories.
- Collaborators: Collaborators can clone and pull any repository. They can also open issues and comment on any issue.
- Everyone on the web is a Collaborator. They just need a Github account to find our repos and participate in conversation. This means anyone inside or outside Mozilla can collaborate with us just by signing up for Github - we don’t need to explicitly add to them to our project repos.
- Owners: Owners create repos and add/remove Members. Owners can also make Contributors into Members. We’ll get into more details on Owners later.