Loop/QA/WebRTC Lab
Setting Up Your Own WebRTC Sunny Day Environment
Purpose
QA has a "Sunny Day" minimal network environment stood up for automated testing of WebRTC.
Location and Machines
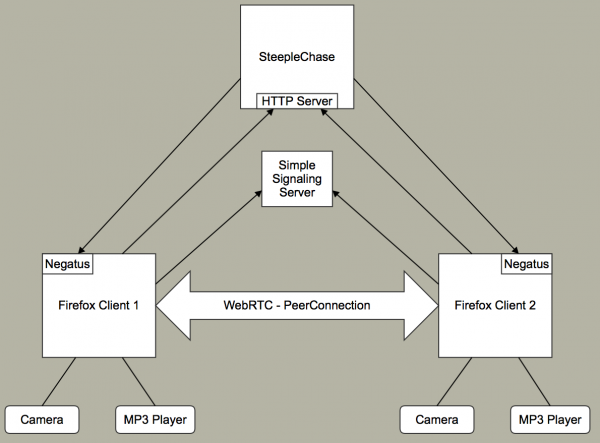
The Sunny Day environment is in the MTV QA Lab within the MTV network environment, and comprises the following machines:
- WebRTC server
- Runs a Steeplechase instance to split WebRTC session tests between two clients
- Runs other signaling servers (TURN, STUN, ntpd, etc.) needed to enable the session.
- First WebRTC test client
- Second WebRTC test client
Daemons
Signaling Server
- Does basic call setup between the two clients
- Runs on the server instance
- Install build command and runtime dependencies: apt-get install git nodejs npm
- Clone from https://github.com/luser/simplesignalling
- Install socket.io for Node: npm install socket.io@0.9.6
- Note: simplesignalling server does not work with socket.io >=1.0
- Note: On Ubuntu LTS right after the heartbleed attack npm refused to work, the following commands allowed the installation BUT degrades the security of your system
- npm cache clean -f
- npm install -g n
- npm set ca null
- I could not get that to work; I did:
- sudo npm config set registry http://registry.npmjs.org/
- Note that this command takes security out of the loop entirely.
- Invoke with node ./server.js in base directory
- The init script /etc/init.d/simplesignaling allows to start/stop and restart the process
Negatus (SUT Agent)
- Listens for steeplechase to receive binaries and invoke test commands
- Runs on each client instance
Linux
- Install required commands and build dependencies: apt-get install git g++ libnspr4-dev
- Clone Git repository from https://github.com/mozilla/Negatus
- Build with make -f Makefile.linux
- Invoke with ./agent in base directory post-build
The init script /etc/init.d/negatus allows to start/stop and restart the daemon
Mac
- Install Xcode and command-line tools.
- Build nspr.
- Download latest from https://ftp.mozilla.org/pub/mozilla.org/nspr/releases/
- Unpack the archive.
- From the top-level, do the following commands:
- configure
- make
- sudo make install
- Clone Git repository from https://github.com/sydvicious/Negatus.
- Build with make -f Makefile.macosx
- Invoke with ./agent in base directory post-build. Note that if you have a firewall turned on, the Mac will put up an alert asking you to let it open ports. I have not done much investigation, but it appears that Negatus would need to be a signed app for that not to happen. I am going to run it in VMs with no firewalls turned on, at least initially.
Tests
Firefox Binary and Tests
- Stage on server instance -- will be distributed to clients by steeplechase
- Download from http://ftp.mozilla.org/pub/mozilla.org/firefox/nightly/latest-trunk/ (or alternate location as desired)
- Download firefox-*.en-US.linux-x86_64.tar.bz2
- Download firefox-*.en-US.linux-x86_64.tests.zip
- Untar/extract both into separate directories
Steeplechase
- Execute on server instance
- Install require binaries and dependencies: apt-get install git python-setuptools
- Clone Git repository from https://github.com/mozilla/steeplechase/
- From within the steeplechase directory, install dependencies with sudo python setup.py install
- Invoke runsteeplechase.py with appropriate command line options.
Example:
(Assumes you cloned steeplechase into ~/src, extracted Firefox into ~/bin/firefox, and extracted tests into ~/tests)
/usr/bin/env python ~/src/steeplechase/steeplechase/runsteeplechase.py --binary ~/bin/firefox/firefox --specialpowers-path ~/tests/steeplechase/specialpowers --prefs-file ~/tests/steeplechase/prefs_general.js --signalling-server 'http://10.252.73.224:8080/' --html-manifest ~/tests/steeplechase/tests/steeplechase.ini --host1 10.252.73.222:20701 --host2 10.252.73.223:20701
Change IP addresses/hostnames as appropriate for your network.
- Options for the runsteeplechase.py command:
Options:
 -h, --help            show this help message and exit
 --binary=BINARY       path to application (required)
 --binary2=BINARY2     path to application for client 2. defaults to BINARY
 --html-manifest=HTML_MANIFEST
                       Manifest of HTML tests to run
 --specialpowers-path=SPECIALPOWERS
                       path to specialpowers extension (required)
 --prefs-file=PREFS    path to testing preferences file
 --host1=HOST1         first remote host to run tests on
 --host2=HOST2         first remote host to run tests on
 --signalling-server=SIGNALLING_SERVER
                       signalling server URL to use for tests
 --noSetup             do not copy files to device (don't copy binary)
 --remote-webserver=REMOTE_WEBSERVER
                       ip address to use for webserver
 --x-display=REMOTE_XDISPLAY
                       x display to use on remote system
 --save-logs-to=LOG_DEST
                       save client logs to this directory
Running in VMs
VM Setup
You can use 3 VMs of Ubuntu 14.04 Desktop with 2 cores, 2GB RAM, 20GB disk space. Install using above instructions. Then, invoke the tests using the command line given, with webrtc-steeplechase, webrtc-slave1, and webrtc-slave2 as the host names.
Build Environment
To fix and develop tests yourself please follow these instructions on how to setup your build environment locally https://wiki.mozilla.org/QA/Automation/Projects/WebRTC
