Gaia/Settings/docs
Settings
This is an overview of settings app. It covers architectural design, module system that we used, suggested patterns to follow, and brief description on important panels. Links to details are provided inline.
Architecture
Settings app comprises panels for configuring various settings of a device. In general the panels responsible for different settings can work independently while certain settings may require a group of panels, for example, keyboard settings. The architecture was designed to allow new panels to be created easily without worrying about affecting other panels in the app.
Settings app uses requirejs for module definition and management. All scripts should be defined as AMD modules except for ones that we would like them to be executed upon the starting up where requirejs has not been loaded yet.
A panel can be associated with an AMD module implementing a specified interface. In the module we can then require other necessary modules that are used in the panel.
Start Up Path
To present the visuals as fast as possible, we determine the first panel to be displayed and then append the HTML elements of the panel to the DOM tree. In normal launch path the first panel would be the root panel, while if the app is invoked by an activity request, the first panel is determined by the parameter. Note that at this time the panel is visible but still not interactive because the associated modules of the panel are not loaded yet.
There can be a short gap between the panel being presented and all fundamental modules loaded. The time results from loading and initializing requirejs. "InitialPanelHandler"(js/startup.js) was introduced to provide basic interactions until the associated modules get loaded. One can provide their own panel handler if the required interactions are beyond what InitialPanelHandler can provide.
window.LaunchContext is constructed during the starting up. The object has a property called pendingTargetPanel that specifies the panel that a user would like to navigate. When the fundamental modules are loaded, the user is brought to the specific panel.
Panel
A panel comprises HTML elements and an optional associated module. This document shows how to create a new panel.
All panels are delay loaded. HTML elements of a panel are stored in a comment node before they are rendered. The actual UI elements are created and appended to the DOM tree only when users navigate to the panel. "PanelCache"(js/modules/panel_cache.js) then look for the path of the associated module specified in the "panel" element within the appended elements. If there is no module specified, the basic module "Panel"(js/modules/panel.js) is used.
The associated module is usually deriving from "SettingsPanel"(js/modules/settings_panel.js) or "Panel"(js/modules/panel.js). Panel provides the basic functionality that allows settings app to control the visibility and life cycle. In addition to that, SettingsPanel further creates bindings between the UI elements and the settings database when the module is being initialized. This part is handled in "PanelUtils"(js/modules/panel_utils.js). Details of creating an associated module please refer to here.
"navigate#SettingsService"(js/modules/settings_service.js) is used to navigate to any panel by providing the panel id and the options to be passed to the panel. Note that this function behaves like an url link and there is no way for the target panel to return any result. If you would like to share information among panels, you must create a shared module that can be used in the panels, or consider to use "DialogService"(js/modules/dialog_service.js) which allows to return results.
Dialog Service
Flowchart
Introduction
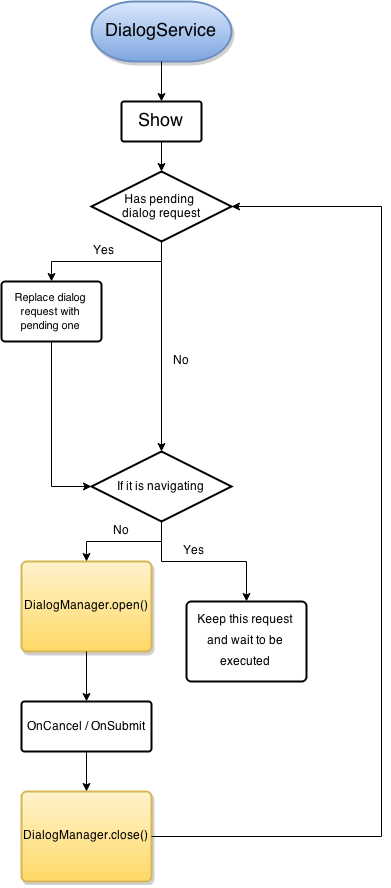
DialogService focuses on controlling states between dialogs, it will make sure every time there is only one dialog showing up on the screen and for the others, they will be queued as an internal state and will be executed one by one when current dialog is dismissed.
Right now we support 4 different types of dialogs, AlertDialog, ConfirmDialog, PromptDialog and PanelDialog in DialogService.
For the previous three dialogs, they are used as a substitution of native alert, confirm and prompt API with predefined layout based on UX’s spec. While for PanelDialog, you can define your own dialog with pre-defined interface and DialogService will help you show it with all necessary callbacks are bounded on UI.
While for lifecycle of dialogs, they are all handled in DialogManager and please go check related documentation for this part.
Dialog Manager
Flowchart
Introduction
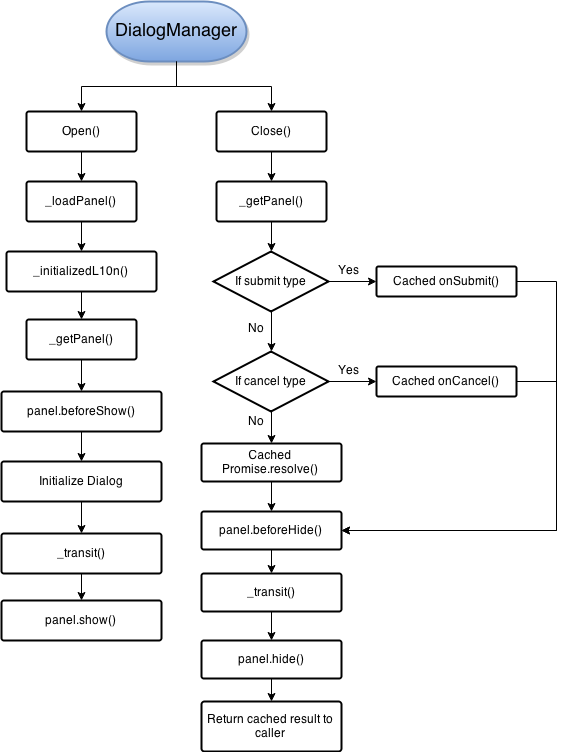
DialogManager is a manager that mainly focuses on controlling the whole life cycle of each dialog. It will load panel, initialize panel, use pre-defined transition to show panel when DialogManager.open() is called. While for DialogManager.close(), it will find out which panel is going to be closed, validate the result of onSubmit() or onCancel(), and use pre-defined transition to hide panel.
Basically, this DialogManager will be only used accompanied with DialogService. If you want to know more details about how they are communicated with each other, you can go check settings/js/modules/dialog_service.js for more details.
Common Patterns
The basic principals are view/logic separation and creating modules that have clear roles and responsibilities. There are two typical roles: view and model.
A view connects the UI elements to a model. It updates the content of the UI elements based on the values of the properties provided by the model. Meanwhile, when users interact with the UI elements, the view is responsible for calling to the corresponding methods of the model.
A model is designed to support views. It is not a passive model that only stores static data but provides methods for manipulating the data and actively reports the changes of the model. A model is not allowed to touch the UI elements directly and should not hold any reference of a view.
This pattern is especially helpful when encountering subtle UX requirements changes because we can change the view easily without modifying the model. Writing unit tests becomes simple when models do not touch the UI elements and it is no longer required to mock the UI elements.
The key is to make a model actively report the status in terms of events and property changes. The following modules can be useful when designing models: "Observable"(js/modules/mvvm/observable.js), "ObservableArray"(js/modules/mvvm/observable_array.js), and "EventEmitter"(js/modules/mvvm/event_emitter.js).
Let's use "Wallpaper"(js/panels/display/wallpaper.js) as an example of models. The idea was to hide the complexity of selecting wallpapers and expose the API that is easy to use in the view module.
The method selectWallpaper is used to trigger wallpaper selection while wallpaperSrc is an observable property representing the path to the current wallpaper. We can make any kind of UI trigger a call to selectWallpaper. When the selection completes, wallpaperSrc gets updated to the latest value. The view can then make use of wallpaperSrc to fulfill various requirements such as displaying the path or showing the entire wallpaper.
Modules in Settings
Define Modules
Settings modules are AMD modules. In addition to following the syntax of AMD modules, settings app also requires that the returning object must not a constructor function. Thus we can expect that all modules are able to be used without a "new" keyword. The other advantage is that the returning functions can be seen as factory methods. A factory method can return different type of objects based on the parameters, which is useful in certain use cases.
Configure Requirejs
Shim
Settings app uses shared modules under shared/. In order to make them able to be loaded using requirejs, we need to declare shims for them. With the following shim declared, require(shared/lazy_loader); actually loads shared/lazy_loader.js and returns the object LazyLoader defined in the script.
 'shared/lazy_loader': {
   exports: 'LazyLoader'
 }
Module
A module can depend on many others and it makes sense to merge them into one script to reduce the loading time. When we declare the modules in require.js, all dependent modules are merged in the build process by r.js. Note that for fundamental modules frequently used by other ones, merging them may lead to duplicated code. This can be avoided by listing modules to be excluded.
For example, the following module declaration creates a script containing all dependent modules starting from "modules/apn/apn_settings_manager" excluding "main", "modules/async_storage", and "modules/mvvm/observable". The paths in the "exclude" can be ordinary modules or modules just being declared in require.js.
 name: 'modules/apn/apn_settings_manager',
 exclude: [
   'main',
   'modules/async_storage',
   'modules/mvvm/observable'
 ]
The other way of preventing a module from being merged is specifying the path of a module as empty: in the path object in build/settings.build.jslike.
Panels
Root
Airplane Mode
Wifi
Bluetooth
Sim Security
Sim Manager
Operator Settings
Call Settings
APN Settings
Keyboard Settings
Media Storage
Build
The build process is implemented in build/build.js. It does the following things:
Merge scripts
The scripts are merged by r.js based on configuration in build/settings.build.jslike, in which we specify the main config file as config/require.js where we define the modules.
Minify scripts
To further reduce the size of the scripts we need to minify the scripts. Although we can do the minification in the merge step by r.js but it does not support ES6 syntax for this time being, so we turned to use jsmin that merely remove the comments, spaces, and line breaks.
Settings app uses some json files for customization purpose. support.json specifies the information for requesting call or online support. device-features.json lists the hardware information that we are not able to retrieve from gecko for this time being. findmydevice.json specifies the version of the find my device api that is being used. eu-roaming.json has the information specifying which operators should follow the EU regulation and the default apn settings. Details please refer to the customization guide.
Write gaia commit information
In the build process it grabs the commit information and stores it in gaia_commit.txt. Settings app can then use it to display the information.

