Web Testing/Automation/CodeReviewProcess
Once code has been pushed into a GitHub branch and a pull request has been created the WebQA team will be notified. So what happens next?
Starting a code review
When doing a code review where should you start?
- Start by checking that the pull conforms as much as possible to the [StyleGuide]
- Use a pep8 checker to ensure that the code conforms to pep8 (except for line length)
- Check that the code meets Python best-practices
- Check that the code looks maintainable and easy to read
- Make sure you click on the diff button and add comments in line there. It makes life easier for others doing code reviews since they don't need to hunt for your comment.
- Run the tests to make sure they pass.
- This means making sure than any tests affected by the pull request pass, which may include tests that were not changed by the pull request. For example, if a page object changes then any tests that use that page object should be tested. If in doubt about which tests may have been affected, just run the complete test suite.
Who can do a code review?
The whole Mozilla Web QA team can do code reviews and the whole team is encouraged to do code reviews. The reason behind this is that we all learn by new techniques that people think of. It also opens a discussion between the whole team if we feel that something should change. Voluntary contributors are also encouraged to do code reviews, especially those with significant experience with our tests.
Who can't do a code review?
You can't review your own code! (Similarly, you also cannot merge in your own code/pull requests.)
Addressing comments in a code review
During the code review
As the submitter, you should:
- Read and respond to all comments made by reviewers.
- When making changes to your code in response to comments, create a new commit for the changes and push it individually to Github. Do not squash commits at this point as it makes it much harder for your reviewers to see what you have done to address their comments.
- After pushing a new commit add a comment to the pull request as GitHub will not automatically inform anyone of the fact that you have pushed a new commit.
At then end of the code review
Once the pull request has received the required number of positive reviews (usually one or two), you should squash your commits locally if you are able to and then push a new single commit to your fork to replace all of the commits that were created during the review process. If you are not comfortable doing this squash then request that it be done by someone else by leaving a comment on the pull request.
Merging a pull request
Before merging a pull request do the following:
- Make sure all the tests are still passing.
- Make sure the pull request has at least one positive review.
- Make sure that the commits in the pull request have been appropriately squashed.
- If they have not been, ask the submitter whether they are comfortable doing so, and offer to help them if they would like to learn.
- If the submitter is not comfortable doing the squash themselves, you can do it locally for them via the command line. In this case you would not use the "Merge pull request" button in Github.
- Note that if the review process was particularly lengthy and resulted in multiple changes it may make sense to keep more than one commit, but in general commits should be squashed.
After verifying the above, click the big green "Merge pull request" button in Github, unless you have already done the merge via the command line.
After the merge is complete please watch the next build in Jenkins to ensure that it is green, or at least adds no new failures.
Who can do merges?
- In general, you cannot merge-in your own code/pull requests, but if it has received a positive review from someone else you can merge it yourself on their behalf.
- Anyone who has tested the patch against all the affected/intended environments (and made sure it's had at least one review)
Squashing commits before merging a feature branch
There are two suggested ways of squashing commits locally in order to reduce the number of commits in a branch to one before merging the branch into master. The first one, interactive rebase is likely the simplest, so we suggest you try that first.
Using interactive rebase to squash commits
You will use git's interactive rebase feature to take all of the commits that are currently in the branch and squash them into a single commit.
Note: If all the commits are ones that were added only to the feature branch then you should not run into any issues. If your feature branch includes commits from master that were pulled in during development of the feature, you could encounter conflicts when doing the interactive rebase which you'll need to address. In this case it might be simpler to go with the second option merge with --squash.
Complete the following steps, which should be done from the feature branch:
- Start up an interactive rebase session to squash all of the commits in the feature branch that are not currently in the master branch:
git rebase -i master
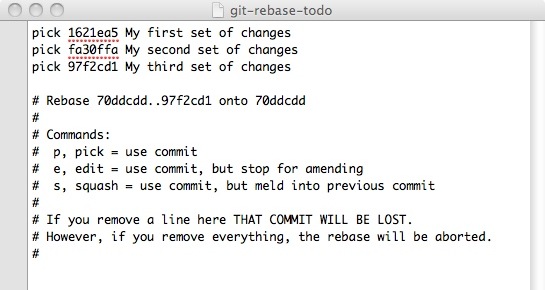
- This will pop open a code editor (whichever one is configured to be used with git) with a file that includes some rebasing instructions. The file will look something like this:
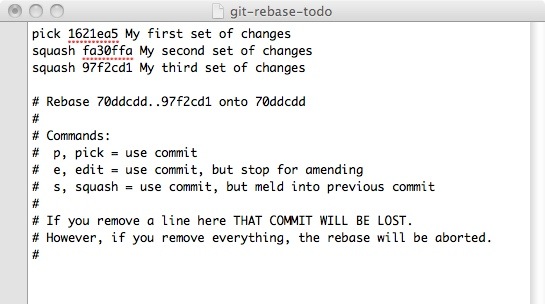
- This is convenient as git provides you with some instructions. In this example, you want to combine the second and third commit with the first, so you would edit the file to look like this:
- Note that you can just type an
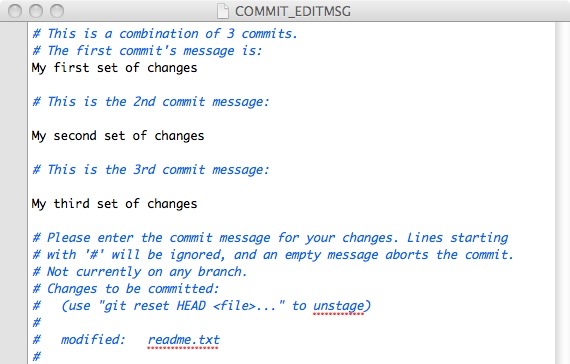
sinstead of the whole wordsquash. - When you save and close the file git will pop open another file in the editor to edit the commit message:
- From here you can either choose to accept the three individual commit messages that were picked up from the three commits, or you can remove them (or comment them out) and provide your own commit message. When you save and close this file you'll be back at the command line with a message similar to this:
Successfully rebased and updated refs/heads/my_branch.
- If you have done this for your own pull request you can now push the new commit to your branch, forcing the new commit to overwrite any previous commits:
git push -f origin my_branch
- If you are doing this on behalf of someone else, in order to squash their commits before merging, you can merge this new branch into your local master branch and then push the master branch:
git checkout mastergit pull upstream mastergit merge my_branchgit push upstream master
Using merge with --squash to squash commits
This method is a bit simpler than the above, but it requires an extra step which can be prone to user error. This is because when you do a merge with --squash, you lose the author information, so you need to know what those values need to be and then update them afterwards. Here's an example.
If we have a feature branch called my_branch and want to merge it into master and squash the commits, we would do the following:
- Switch to the
masterbranch:git checkout master - Merge the feature branch:
git merge my_branch --squash - This will bring the changes in, but not commit them, so you need to do that:
git commit- This will open your editor to specify the commit message, and it will be pre-populated with information from each commit in the feature branch. You can use some of these commit messages, or you can create your own. Make a note of the author specified in this file as you will need to use that value to update the author.
- After you save the file you will be returned to the command line and the new commit will be added to the repo.
- Now you need to update the author of this new commit to give ownership back to the original author (because you will currently be recorded as the author):
git commit --amend --author='exact_author_from_the_previous_commits'- This will open your code editor one last time, which will allow you to edit the commit message again, but you won't need to change it as you will have already edited it in the step before, so just save and close the file.
- As you are likely doing this in order to squash commits on behalf of someone else before merging, you can now push your local master branch to the main repo in order to merge the changes:
git push upstream master


