ReferencePlatforms/Test/Tegra250-Android
Fedora 14 Imaging steps
Prepare the netbook
- If you don't have an imaging netbook, you need to first follow the steps here.
- Power on, log in.
- A USB-to-mini-USB cable should already be plugged into the netbook.
Format an SD card
If you don't already have a properly formatted SD card, you need to format one.
- Insert an SD4/8GB SD card into the SD card reader on the right side of the netbook.
- Applications -> System Tools -> Disk Utility
- click on the Generic Multi-Card under Peripheral Devices
- if it's mounted, "Unmount Volume"
- Format Volume (FAT).
Prepare the Tegra
- Connect the following cables to the Tegra:
- ethernet cable (connect to build network).
- USB keyboard and mouse
- Mini-USB cable connected to imaging netbook
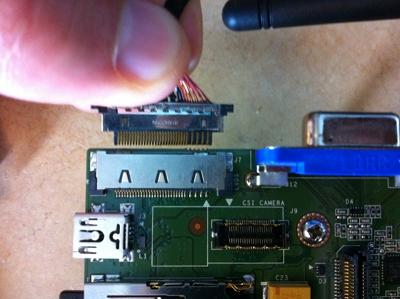
- LCD video cable to small screen -- see illustration
NOTE: do not ever connect or disconnect the LCD while the tegra is powered on!
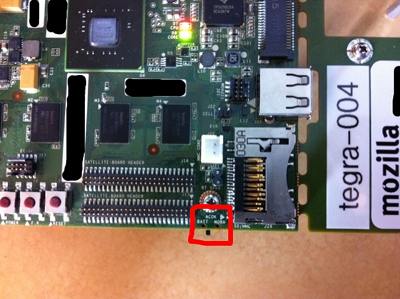
- Make sure the ACOK switch is set in the NORM position.
- Insert the formatted SD card.
- Connect power. The board should power on automatically if the ACOK switch is set correctly.
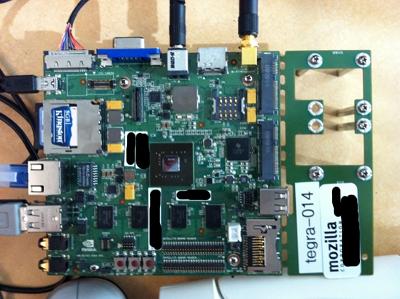
- The Tegra should look like this:
Put the Tegra into flashing mode
If the Tegra's power buttons are on the side facing you, the power button is on the left.
You need to do the following steps immediately after booting. This will happen immediately if the ACOK switch is set to NORM. If you need to reset, hit the reset button:
Immediately after booting, push and hold the firmware reset button (middle) for 2 seconds:
Then, while still holding the firmware reset button, also hold down the reset button (right) for 2 seconds:
Then, let go of the reset button but keep pressing the firmware reset button for 2 seconds:
Then let go. The screen should be dark.
Flash the Tegra with Android 2.2 (Froyo)
On the netbook, you should still have your android_image bash prompt up.
cd ~/android-tegra/tegra_froyo_20101105
./nvflash_lcd.sh
If you get "USB device not foundPress enter to continue:" you need to put the Tegra in flashing mode.
Otherwise you should see a lot of creating partition/formatting partition/sending file messages with "done!" and "successfully".
If you see no errors and you get "Press enter to continue:", your Tegra should already be booting into Android 2.2.
Press enter and wait for the Tegra to boot.
Install SUT
In your android_install bash prompt:
./initialize.sh SERVER_IP
SERVER_IPs to use:
| Server name | Server use | Tegra list | SERVER_IP |
|---|---|---|---|
| bm-foopy | staging | tegra-001 - tegra-010 | 10.250.48.9 |
| foopy01 | production 01 | tegra-011 - tegra-030 | 10.250.48.151 |
| foopy02 | production 02 | tegra-031 - tegra-050 | 10.250.48.152 |
There's nothing harmful about trying this multiple times if needed. (The installs will fail out on subsequent attempts if they were successful previously and run without a -r option.)
The 'am' command launched a preference window on your Tegra! With your Tegra keyboard or mouse:
- Development -> Stay Awake
Click "Stay Awake" once. This is a toggle, where the toggle setting is off the screen. If you click twice, you just turned it off again.
Headless, without a mouse, you can:
- down arrow x4
- return
- down arrow
- return
- esc esc
- Hit 'esc' on your Tegra USB keyboard twice.
- If you clicked "Stay Awake" properly, your Tegra shouldn't shut off immediately.
- Once you've verified it doesn't shut off immediately (give it a few minutes, ideally), you can reset it via button or adb reboot .
Add buildbot slave + clientproxy on bm-foopy
We're going to overload bm-foopy soon, so we'll need a bunch of 'em. The following should be true, though:
- You already added this tegra to Inventory, graphs, DHCP static IP + DNS, Nagios, and the buildbot slave list, correct?
- ssh cltbld@bm-foopy
cd /builds
mkdir tegra-015
cd tegra-015
buildslave create-slave `pwd` bm-foopy.build.mozilla.org:8012 tegra-015 PASSWORD
Make sure the buildbot.tac looks good. Don't start the slave manually!
Edit /builds/tegras.txt to add the new tegra:
tegra-015 IP.ADD.RE.SS
clientproxy.py should automatically detect the new Tegra and start the buildslave, assuming it's up and running SUT.
Windows 7 Imaging steps
Prepare the netbook
- If you don't have an imaging netbook, you need to first follow the steps here.
- Power on, log in.
- A USB-to-mini-USB cable should already be plugged into the netbook.
- Open the shortcut on the desktop: android_image (with cygwin icon).
- This should place you in /cygdrive/c/android-tegra/tegra_froyo_20101105
Format an SD card
If you don't already have a properly formatted SD card, you need to format one.
- Insert an SD4/8GB SD card into the SD card reader on the right side of the netbook.
- Right click on the start button and open Windows Explorer.
- Right click on Removable disk (E:) and choose Format.
- Choose File system "FAT32 (default)" and Allocation unit size "Default allocation size"
- Make sure "Quick Format" is checked
- Click Start, then Ok.
- When it finishes, click Ok, close the Format Removable Disk window, and eject the SD card.
Prepare the Tegra
- Connect the following cables to the Tegra:
- ethernet cable (connect to build network).
- USB keyboard and mouse
- Mini-USB cable connected to imaging netbook
- LVDS video cable to small screen -- see illustration
- Make sure the ACOK switch is set in the NORM position.
- Insert the formatted SD card.
- Connect power. The board should power on automatically if the ACOK switch is set correctly.
- The Tegra should look like this:
Put the Tegra into flashing mode
If the Tegra's power buttons are on the side facing you, the power button is on the left. Push the power button until two lights (orange and green) power up on the Tegra:
The screen should have some text.
Next, push and hold the firmware reset button (middle) for 2 seconds:
Then, while still holding the firmware reset button, also hold down the reset button (right) for 2 seconds:
Then, let go of the reset button but keep pressing the firmware reset button for 2 seconds:
Then let go. The screen should be dark.
Flash the Tegra with Android 2.2 (Froyo)
On the netbook, you should still have your android_image bash prompt up.
./nvflash_1gb_lcd.bat
If you get "USB device not foundPress enter to continue:" you need to put the Tegra in flashing mode.
Otherwise you should see a lot of creating partition/formatting partition/sending file messages with "done!" and "successfully".
If you see no errors and you get "Press enter to continue:", your Tegra should already be booting into Android 2.2.
Press enter and wait for the Tegra to boot.
Install the ADB drivers
This is the fun part! Oh boy!
Throughout this step, you need the Tegra to stay on.
It will keep trying to turn itself off because it believes this is helpful.
You may need to keep pressing a key on its USB keyboard to keep it awake.
- Open Device Manager: use the desktop shortcut, or Start -> Devices and Printers -> File -> Device Manager
If you see an Android Phone device that is the Tegra, you're done with this step. You probably won't, because we love Windows. If you don't:
- Make sure the Tegra is still on!
- If it's turned itself off (no lights, or green light only), power it back on and re-check Device Manager.
If it's *still* not there,
- Open USBDeview: use the desktop shortcut, or
- Open Windows Explorer: right click on Start, Open Windows Explorer
- Navigate to C:\android-tegra\usbdeview
- open usbdeview
In USBDeview:
- Sort by Last Plug/Unplug (arrow pointing up).
- Find the NVIDIA Tegra 2 USB Device at the bottom of the list that is Connected: Yes.
- Right click on it and Uninstall Selected Devices; answer Yes to the dummy prompt
- Close or minimize USBDeview
- Make sure the Tegra is on, and stays on! If it powers itself off before you install the new drivers, you need to reset it and start over from "If it's *still* not there,"
In Device Manager:
- Action -> Scan for hardware changes
- You should see Other devices - NVIDIA Harmony or Universal Serial Bus controllers - Android Debug Bridge interface
- Right click; Properties -> Driver -> Update Driver
- Browse my computer for driver software
- Let me pick from a list of device drivers on my computer
- Android Composite ADB Interface (you may have to click "Android Phone" first)
Now, when the Tegra is connected and powered on, you should see an Android Phone device in Device Manager.
If not, and a Scan for hardware changes doesn't find it, start over.
If so, close Device Manager and USBDeview and move on.
Install SUT
In your android_install bash prompt:
adb devices
# This should show you a device attached!
# If not, make sure the Tegra is up and connected via USB.
# If it's still not detected, you need to go back to the Install the ADB drivers section.
./initialize.sh
OLD WAY:
cd ../SUT    # /cygdrive/c/android-tegra/SUT
adb install SUTAgentAndroidBob18.apk
adb install Watcher.apk
adb push tegra_gainroot.sh /sdcard/tegra_gainroot.sh
adb shell sh /sdcard/tegra_gainroot.sh
adb shell am start -a android.settings.APPLICATION_SETTINGS
adb shell mkdir /mnt/sdcard/tests # until bug 612789 is fixed
There's nothing harmful about trying this multiple times if needed. (The installs will fail out on subsequent attempts if they were successful previously and run without a -r option.)
The 'am' command launched a preference window on your Tegra! With your Tegra mouse:
- Development -> Stay Awake
Click "Stay Awake" once. This is a toggle, where the toggle setting is off the screen. If you click twice, you just turned it off again.
- Hit 'esc' on your Tegra USB keyboard twice.
- If you clicked "Stay Awake" properly, your Tegra shouldn't shut off immediately.
- Once you've verified it doesn't shut off immediately (give it a few minutes, ideally), you can reset it via button or adb reboot .
Add buildbot slave + clientproxy on bm-foopy
We're going to overload bm-foopy soon, so we'll need a bunch of 'em. The following should be true, though:
- You already added this tegra to Inventory, graphs, DHCP static IP + DNS, Nagios, and the buildbot slave list, correct?
- ssh cltbld@bm-foopy
cd /builds
mkdir tegra-015
cd tegra-015
buildslave create-slave `pwd` bm-foopy.build.mozilla.org:8012 tegra-015 PASSWORD
Make sure the buildbot.tac looks good. Don't start the slave manually!
Edit /builds/tegras.txt to add the new tegra:
tegra-015 IP.ADD.RE.SS
clientproxy.py should automatically detect the new Tegra and start the buildslave, assuming it's up and running SUT.


